Global Message Handler
Signals are a powerful feature of Godot. They allow messages to be passed around without the emitter knowing who actually subscribe for receiving them. However, sometimes the subscriber also does not know about the emitter. Grabbing hold of the object might be tricky and could couple your project in ways you don’t intend. That’s where a global signal handler can shine.
Observer pattern
The word "global" sometimes sounds like some scary monster in the programming world. While it’s true the global things can bite you in the back from time to time, they are still a fine choice for many things. One of those is the so called observer pattern.
The main point of this pattern is to decouple the code that can know about an event from the code that needs to take an (unrelated) action when that happens. This lets objects communicate without necessarily knowing about each other. I don’t think I can explain this better than Bob Nystrom, so for a more in-depth explanation of the pattern, please click previous link.
A sample project
To demonstrate an implementation of the signal handler, let’s build a very simple project. We’re gonna make our classic icon.pngsvg move to left or right based on key presses. When it falls from the platform, it will be respawned in a specific point.
Open Godot and create a new project somewhere. We’re starting with the input map to get it out of the way. So let’s make two actions: move_left and move_right. I’m assigning the A and D keys to them since those are common and easily accessible on a regular keyboard.
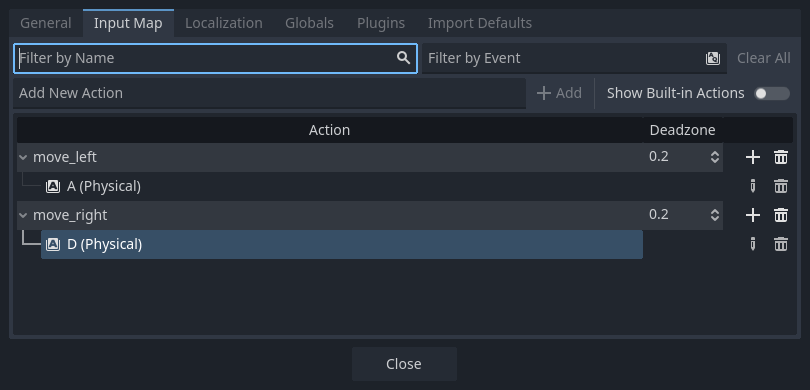
The steps here assumes you are already somewhat familiar with Godot. If you need a reference, you can find the final project in our GitHub. It’s also not following all the best practices so we can have something that fits one article.
Setting up the sample scene
We’re going to create a new scene with a Node2D as the root. I’ll call it Main as it’s my usual goto base name. Under it create a StaticBody2D to serve as the platform. To set it up, add a CollisionShape2D and set a RectangleShape2D with a reasonable size, but it doesn’t need to span longer than the viewport. Add a Sprite2D too so we can see it and use the icon.svg, not forgetting to stretch it up to match the collision shape.
With the floor in place, let’s create our character. Add a aptly named CharacterBody2D to the root node. Add Sprite2D as its child and set the icon.svg as the texture. Like for the floor, make a CollisionShape2D and add a RectangleShape2D to it. Make the shape match the icon, which can easily be done by setting both of its dimensions to 128px. Also add a Camera2D to the character node so we can have the view follow it. Move the character node to a place on top of the floor.
Next, let’s create a big area to detect when the character falls. First make an Area2D under the root node. As we’re now used to, add a CollisionShape2D and set up a RectangleShape2D. Put the area well under the floor and make it big enough to always catch the character.
To set up our spawn point visually, add a Marker2D node under the root and place it near the character (it doesn’t need to be exact). The important part is that the player is respawned over the floor.
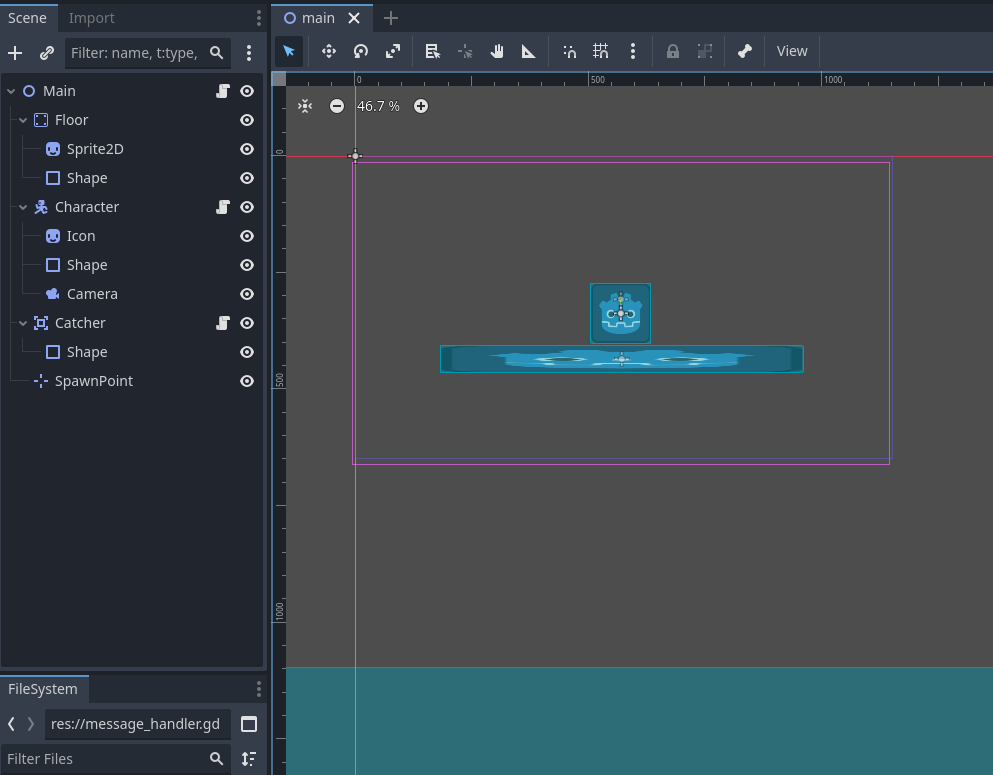
Let’s name our nodes to makes things easier to reference. The floor node is just called Floor and so the character is also called Character. The area is called Catcher because it catches the player. The Marker2D can be renamed to SpawnPoint. At this point you should have a scene similar to this:
Character movement
Add a new script to our Character node. We’re gonna leverage Godot physics here to make the movement script very simple. The code is the following:
# character.gd
extends CharacterBody2D

const SPEED := 250.0
const GRAVITY := 980.0

func _physics_process(_delta: float) -> void:
	var direction := Input.get_axis("move_left", "move_right")
	velocity.x = SPEED * direction
	velocity.y = GRAVITY
	move_and_slide()
Again we take some liberties here for the sake of brevity (such as using gravity as a speed instead of acceleration).
If you play the scene at this moment you’ll already be able to move the character left and right. If you go beyond the floor’s edges, the character will fall forever since there’s nothing to stop it. If you enable Visible Collision Shapes in the Debug menu you can see where the area is.
Message handler
Before we can connect things around, we need our handler. Make a new script extending Node and call it message_handler.gd. To make it global, we’re gonna add it as an Autoload in the Project Settings. Accept the default name after selecting the script (MessageHandler) and make sure the Global Variable option is enabled.
We’re adding two messages for this example. One for when a body is caught by the area and one to tell the character to respawn. Here’s what it looks like:
# message_handler.gd
extends Node

# Needed because we're not using the signals in this script.
@warning_ignore_start("unused_signal")

signal body_caught(body: PhysicsBody2D)
signal respawn(to: Vector2)
As you can see, we’re leveraging the builtin signal system of Godot. We could create an abstraction on top of it for subscribing and emitting events, but that’s work we don’t need. The signals work pretty well for this and we shouldn’t need to replace with something else to justify an abstraction.
Using the handler
Now we can create a script in the Main node (the root) to ask for a respawn whenever a body is caught.
# main.gd
extends Node2D

func  _ready() -> void:
	MessageHandler.body_caught.connect(_on_body_caught)

func _on_body_caught(_body: PhysicsBody2D) -> void:
	MessageHandler.respawn.emit(($SpawnPoint as Marker2D).position)
So we just connect one signal and emit another. The emission is important here because the Main node is the one that knows about the SpawnPoint, so it sends the position from it.
The area node is responsible for emitting the the other signal. We can do it simply with the following script:
# catcher.gd
extends Area2D

func _ready() -> void:
	body_entered.connect(_on_body_enter)

func _on_body_enter(body: PhysicsBody2D):
	MessageHandler.body_caught.emit(body)
This is essentially re-emitting its own body_entered signal with the global one. The interesting part of this is that subscribers won’t need to find the Catcher node to connect to it since they can use the global handler. If you have an achievement for when the player falls 100 times, you can put the counter somewhere else and just connect to the global signal.
Now the character needs to react to the respawn signal and change its own position. We can do this by adding two functions to the character script:
# character.gd
extends CharacterBody2D

...

func _ready() -> void:
	MessageHandler.respawn.connect(respawn)

func respawn(to: Vector2) -> void:
	position = to
We connect to signal at first and whenever it’s fired we just reset the position to wherever the signal points to. If you have multiple checkpoints and want the player to respawn in different points depending on how far they went, the character script doesn’t need to be aware of it since it only reacts to the signal.
If you play the scene now and move the character until it falls, you’ll see it’s respawning back to where the marker is.
An extra usage
The movement is very abrupt when respawning, so let’s add a message to inform the player that it happened.
We’ll start by adding a CanvasLayer under the root node so we have a clean layer for the UI. Then add Label, called it Respawned and set it’s text to be the same as its name. Place it around the center of the screen, a little above where the character is. With the camera following the player, the label position will always be around the same place. Make the label hidden by default.
Now let’s add a script to the label so it reacts to the message:
# respawned.gd
extends Label

const SHOW_TIME := 2

func _ready() -> void:
	MessageHandler.respawn.connect(_on_respawn)

func _on_respawn(_to: Vector2) -> void:
	show()
	await get_tree().create_timer(SHOW_TIME).timeout
	hide()
In this case we don’t really care about the position, only that the respawn happens, but we still need the parameter defined in the callback so it can be properly called. In this case it simply shows the label (turning it’s visible property to true), waits a couple of seconds, the hide it again. This allows the user to see that something happened besides the abrupt movement.
Note that this could be a separate scene altogether and it doesn’t need to know anything about the player or the level to show the message. That’s the major benefit of using a global message handler.
Conclusion
While this simple example doesn’t really need a global message handler, being a single scene and all, it serves as an illustration of the power of such system. In a bigger project with multiple scenes it can be hard and error-prone to acquire node handles in order to connect signals. As the project grows and things move around, those connections might break without being noticed.
There are other ways to handle cases like this, of course. The signal system in Godot is powerful but also simplistic, so sometimes it might not be enough. An example of this is when you need to implement an event queue, which requires a little more than just connecting and emitting signals. If there’s interest, we could add an article on how to implement an event queue in Godot. Let us know via our email [email protected].
You can access the demo project constructed in this article in the following repository: https://github.com/vertexludi/godot-message-handler-demo.
If you need professional support for your Godot project, contact Vertex Ludi.
